<< Previous Next >>

Test You : Student User

TestYou is bundled with a lot of mind blowing features, which offers user a freedom of doing everything relating to online exams, managing the test community.

TestYou can be used by both types of users:

  1. Student : The one who Attempts Tests.
  2. Examiner: The one who can plan or create tests.
  1. Student: The one who Attempts Tests.

Now the most important feature is that the single user can behave as both, test Examinor and student.

How to Start ?

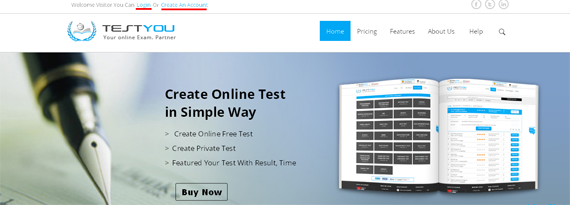
There are two way to start, if you are a registered user then login directly from the Home page or use Login button from the Menu Bar. And if you are not a register user then click on hyperlink given in Login section for New User.
Test You : Student User - screenshot 1

If you go to top most menu bar and click the you find the login box As shown in image..

In These place you login with your user name and password If you are new user than register Follow as shown in below image.

Test You : Student User - screenshot 2

If you don't have a Id and Password then Please press signup link ..

Register your self just with your valid email Id . After registration you get a verfication mail on Your Email Id.


Test You : Student User - screenshot 3

How to Search Test

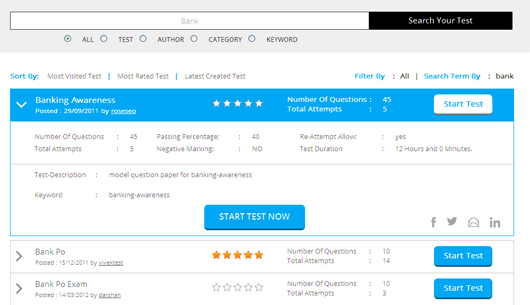
User have option to find any test in easy way by using searching, there are many type of searching are available.

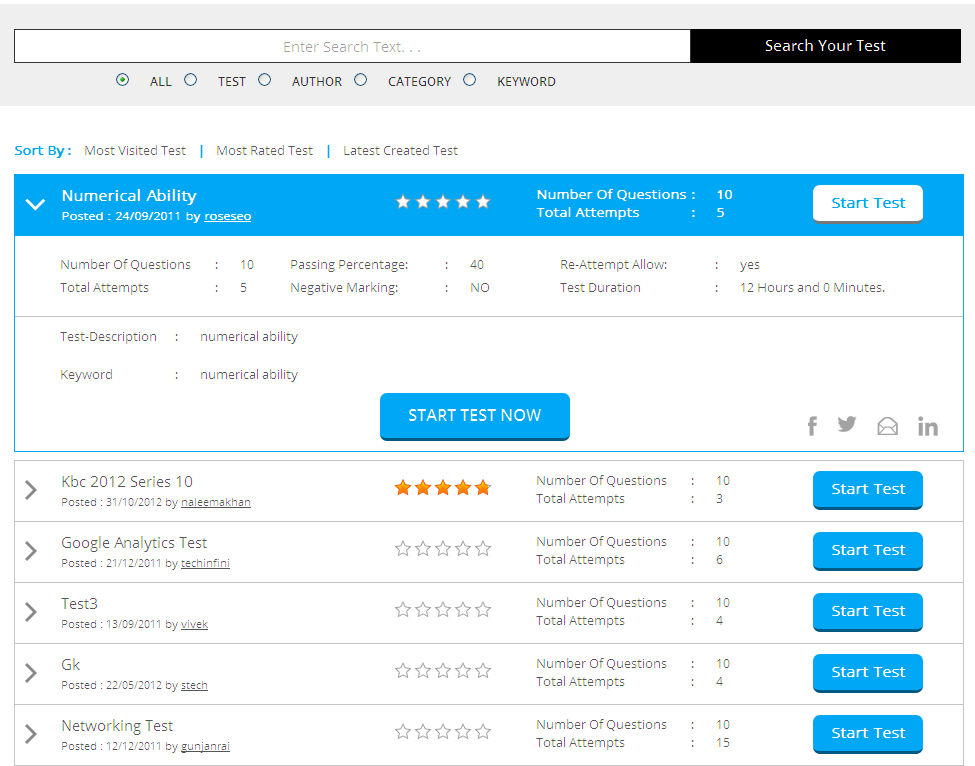
Filter box is available in Test Menu as shown below picture

How to Search Test - screenshot 1

How to Search Test - screenshot 2

The result will be the amalgamation of Author Name, Test Name, Category Name and Test Keywords.

After searching you get all the test according to your selection As shown in image..

How to Search Test - screenshot 3

Attend Test

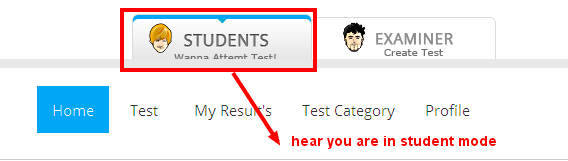
To attend the Test, User needs to login as Student, there are two ways to enter into student Section/Module:

If you not yet Log In:

After entering your username and password, you will direct enter in Student section

Or Already Log In:

The result will be the amalgamation of Author Name, Test Name, Category Name and Test Keywords. If you are already login as Examiner, then you need to click on Student as shown in figure below:

Attend Test - screenshot 1

It will open a new Tab/Window as student Section/Module.

  1. Once you searched/find your desired test to attend, you need to click on button "Start Test" as shown in the picture

    Attend Test - screenshot 2

  2. Test Description:

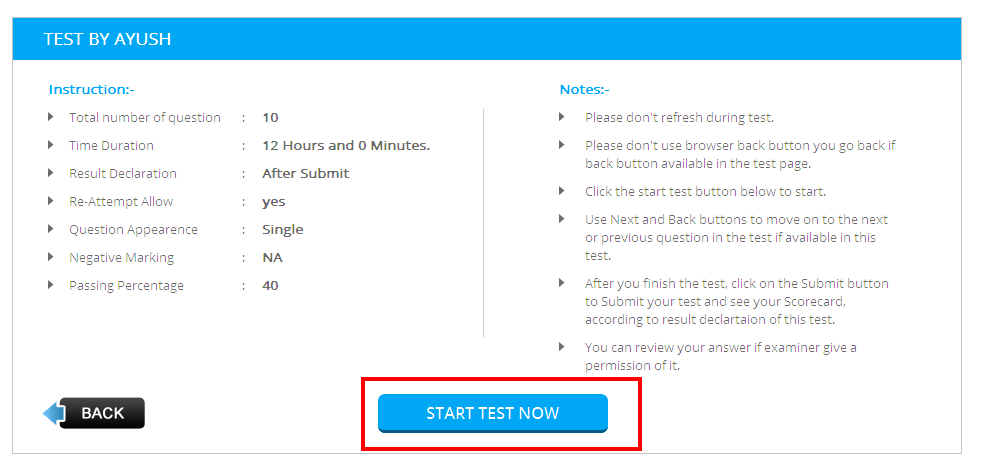
    After clicking Start Test button, you will see the Test Description page. This page will display all the details of the Test like

    • Passing Percentage
    • Negative Marking
    • Test Time:
    • Test Reattempt Time
    • Test Comments
    • And many more…

    To start the Test, you have to click on "Click Here To Start Test" button as shown in below picture.

    Attend Test - screenshot 3

  3. Your Test has been Started

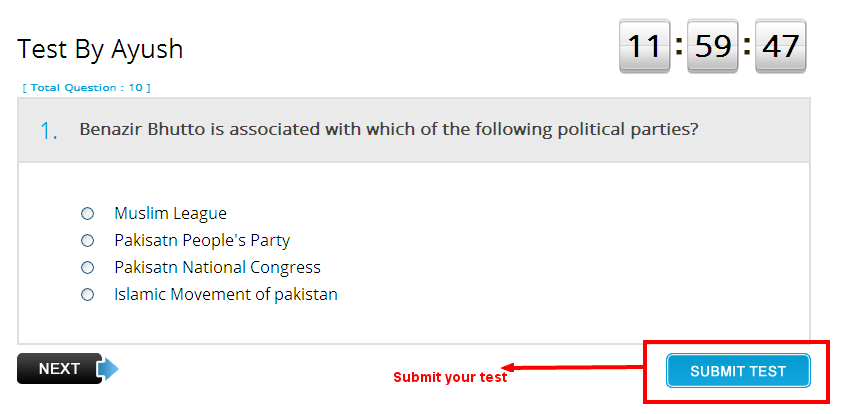
    After clicking on start test button, you can the question of your test. You need to select the Correct Answer for each question and click on "Next" button to get next question as shown in picture below.

    Attend Test - screenshot 4

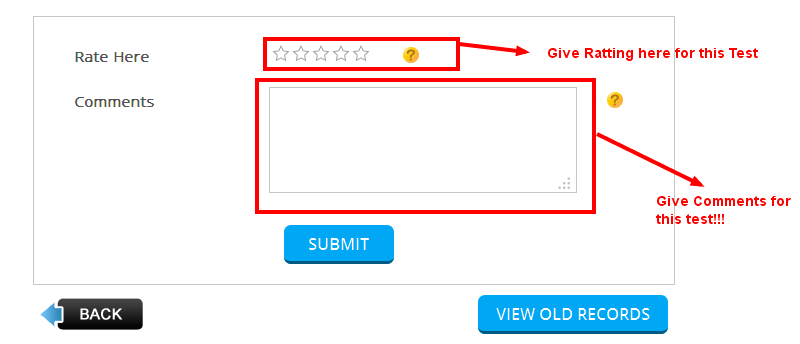
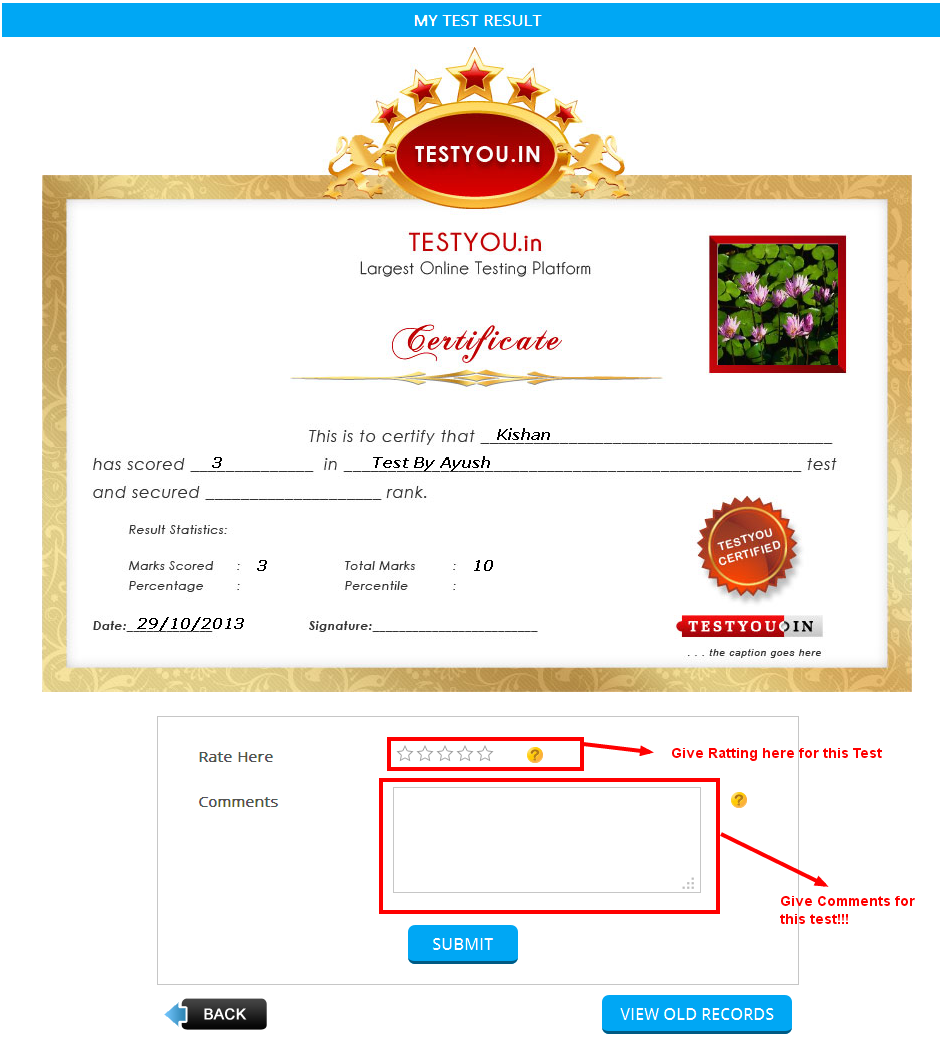
    After attempting all questions your Test Result will display as shown below. Here you can give your valuable comment and Rate to the Test.

    Attend Test - screenshot 5

Result History

To view the Test Results of your entire attended test, you need to click on the Result link as shown in below picture to get all Test Result History.

Result History - screenshot 1

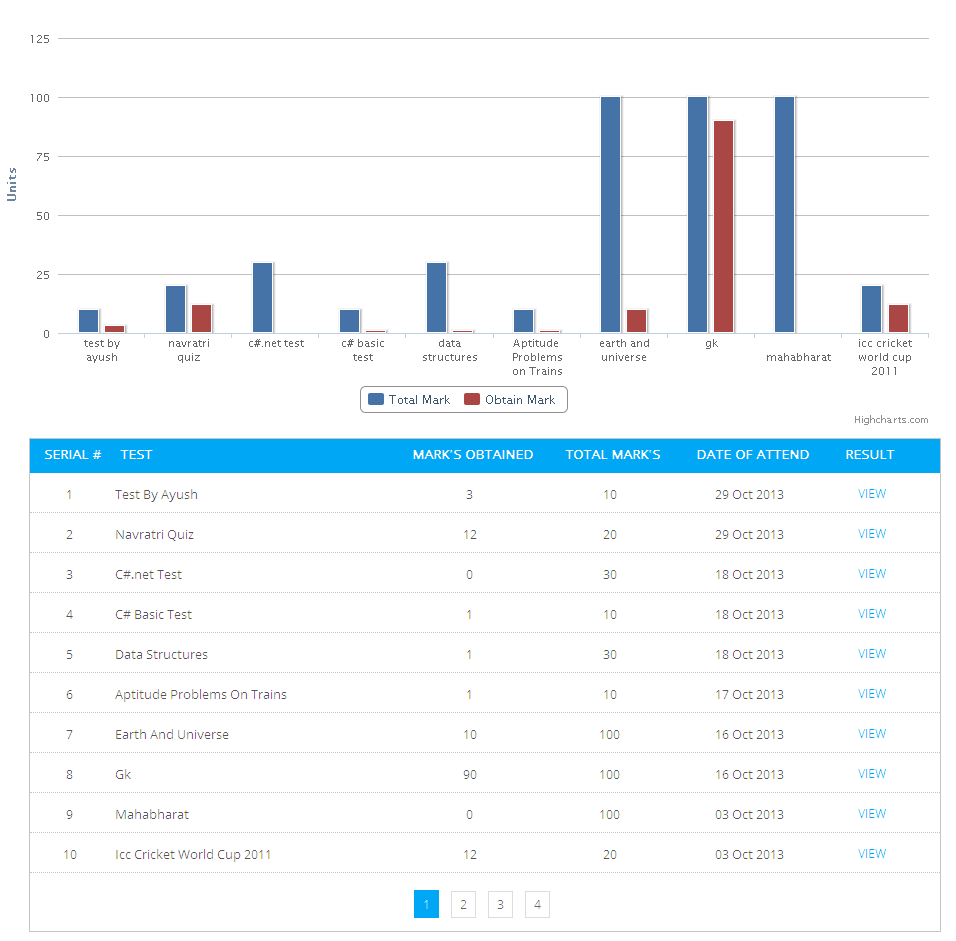
Once you clicked on the Result Link, you will see your Old Test Result stats and graph as show in below figure.

Result History - screenshot 2

Manage Your Profile

User can manage their Information and account details through this functionality.

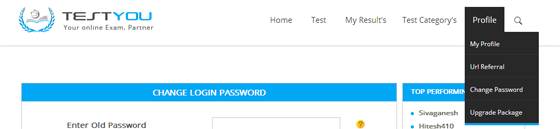
  1. Change Password: Click on the link to change password as shown in the picture below.

    Manage Your Profile - screenshot 1

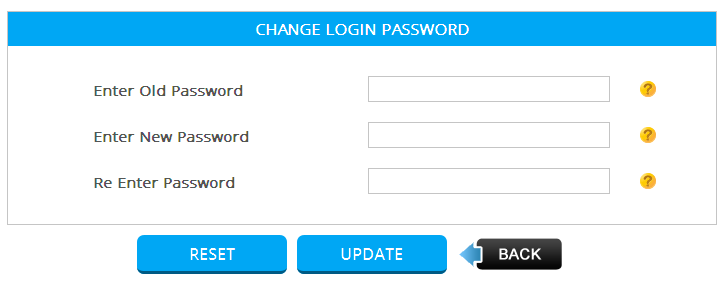
    Enter the required details and click "Change Password" to update the password.

    Manage Your Profile - screenshot 2

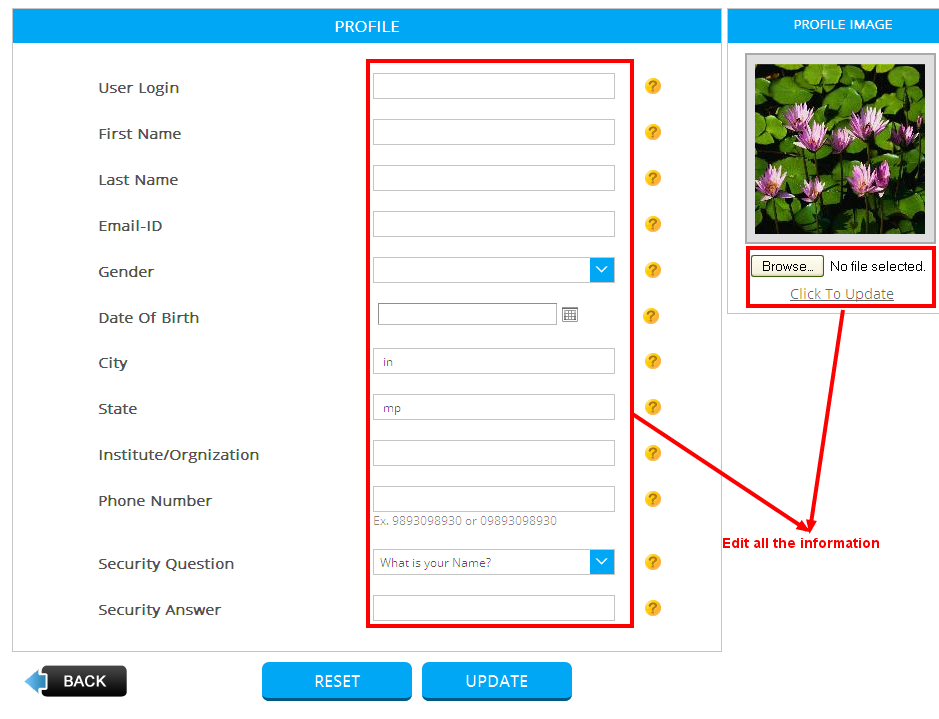
  2. Manage Profile Information: Click on link as shown in the picture.

    Manage Your Profile - screenshot 3

    Update any fields as you wish and click on "Update Profile"to save the details.

    Manage Your Profile - screenshot 4

View Assigned Test Tests

  1. Public Test: Click on the "Test" link from the top navigation as show below.

    View Assigned Test Tests - screenshot 1

    You will get list of the entire public test that available for you and can attend the same:

    View Assigned Test Tests - screenshot 2

  2. Assigned Test:If you belong to some Group or the Test Creator want to you to give its test, then that particular Test will assigned to you, you can either view that Test from the link you received in Registered Email ID, or

    Click on the link "Assigned Test" as shown in the picture below

    View Assigned Test Tests - screenshot 3

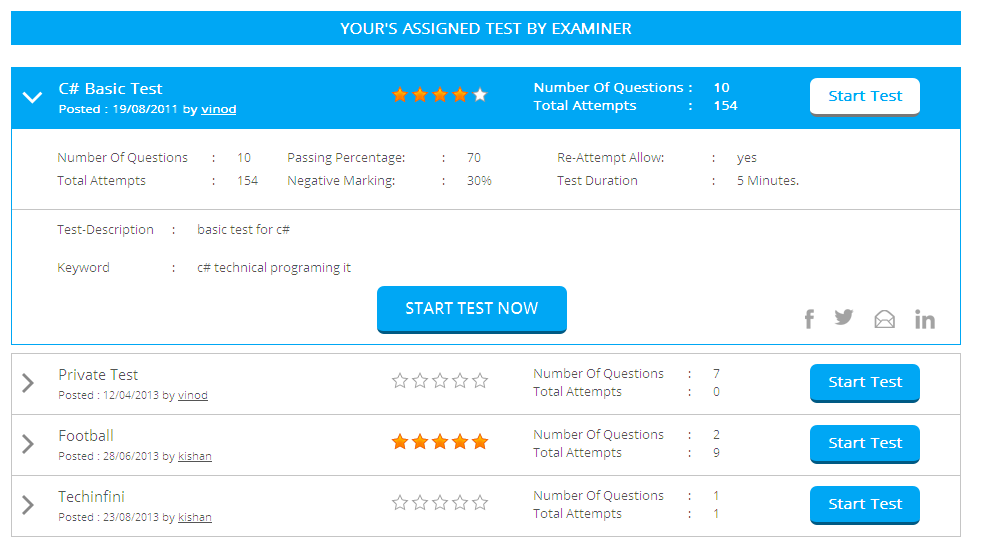
    You will get the Assign Test list as shown in below figure:

    View Assigned Test Tests - screenshot 4

Virtual Discussion

Virtual Discussion:

Virtual Discussion is very important part of TestYou. In any test you can start the discussion about the Questions and/or about the Topic/Subject of the Test. This provides you the best understanding of the Subject and also clears the doubt regarding that topic.

Here Comes the Virtual Part of discussion, where you don't neither to be Test Creator for participating in Discussion nor you have to be always login for the participation in TestYou. You can provide you valuable contribution in any discussion at any point of time. Select the Interesting Topic and post your comment/view on that and you will be the part of that discussion.

Virtual Discussion - screenshot 1

Test You : Admin User

TestYou is bundled with a lot of mind blowing features, which offers user a freedom of doing everything relating to online exams, managing the test community.

TestYou can be used by both types of users:

  1. Admin: One who can plan or create tests.

Now the most important feature is that the single user can behave as both, test admin and student.

How to Start ?

There are two way to start, if you are a registered user then login directly from the Home page or use Login button from the Menu Bar. And if you are not a register user then click on hyperlink given in Login section for New User.

Test You : Admin User - screenshot 1

If you go to top most menu bar and click, you find the login box as shown in image.

In this place you login with your user name and password If you are new user than register Follow as shown in below image.

Test You : Admin User - screenshot 2

If you don't have an Id and Password then Please press signup link...

Register yourself just with your valid email Id . After registration you get a verification mail on Your Email Id.
Test You : Admin User - screenshot 3

Create Test

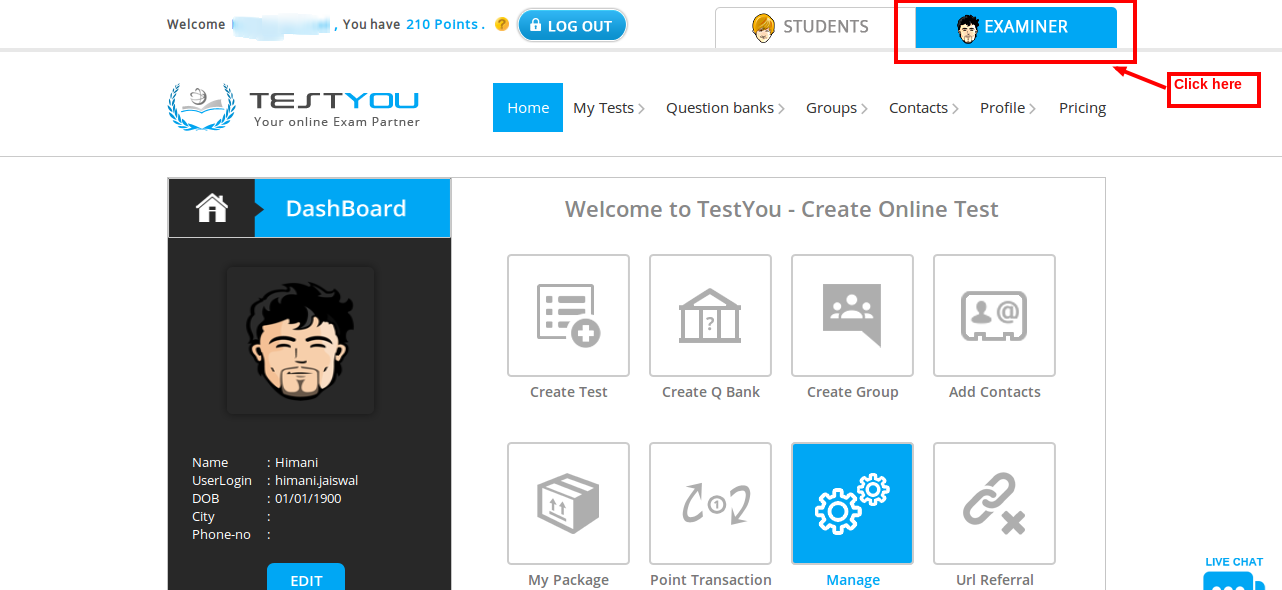
To create Test, After login you need to switch your account to Admin Section/Module by clicking on Admin Button at right middle of screen, as shown in below figure:

Create Test - screenshot 1

After Switching to Admin Section you see the menu tab of My Test and also see in under Test Create menu you choose one from both as shown in below in image:

Create Test - screenshot 2

You create a test just in four steps: go next

Enter Test Details

Step I:Enter Test Details

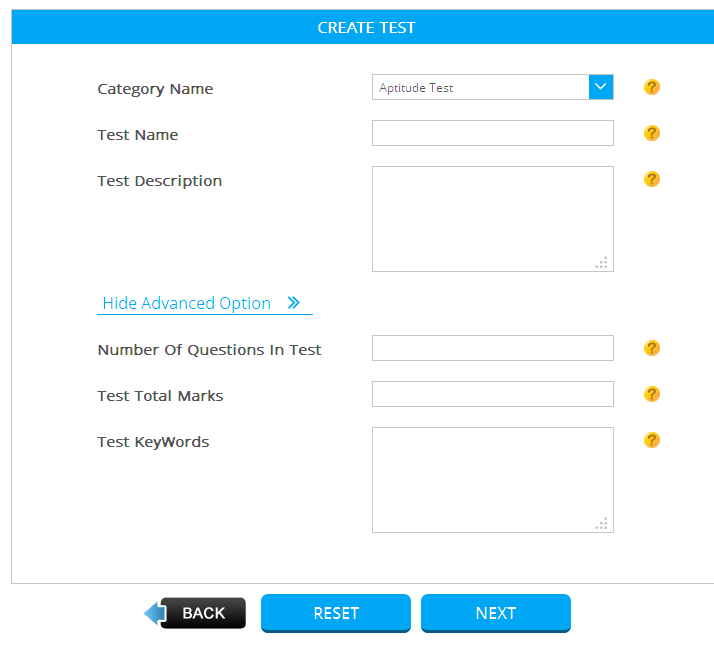
Now you will see the Create Test Page
Here you enter details of your test which you want to create….and Set Advance option in given following image…

Enter Test Details - screenshot 1

Once you filled all required fields and clicked on Submit button, your test will create and you will redirect automatically for Test Setting page to update the Test Setting.

Test Setting

Step II: Test Setting:

You can use so many setting by changing its default value to desired one and customize your test as per your need.

Test Setting - screenshot 1

Update setting as you want to and click on Apply button to save test settings

Add Questions in Test

Step III: Add Questions:

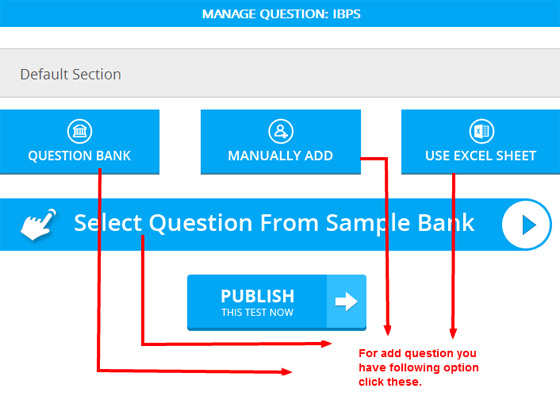
After saving your customized Test Setting, you need to Add Questions to Test. You can add three following types of questions in your test:

  1. True False type questions.
  2. Multiple Choice type questions.
  3. Fill up the Blanks type questions.

You can add Manually or from Question Bank.

Add Questions in Test - screenshot 1

  1. Add Question Manually:

    Click on Add Question Manually button, Selected Correct Question Type (Ture/False, Multiple Choice, Fill up the Blanks) then add your Question by clicking:

    Add Questions in Test - screenshot 2

    Save & New: Select this to Save the existing question and continue to Add Question.

    Save & End: Select this to save the existing Question and End adding further Questions.

  2. Add from QuestionBank:

    You have an Option to Add Create you Test from Existing Question stored/added in Question Bank.

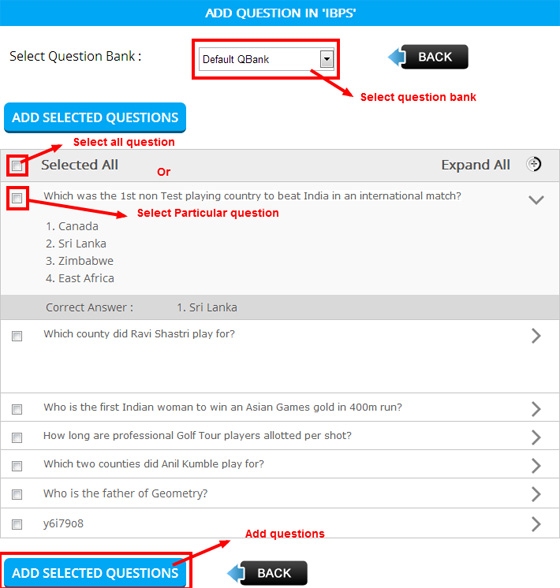
    Click on Add Question from QBank And select the Question Bank name from which you want to select Question for Test.

    Once you select one Question bank from dropdown, here is a list of all available Question Bank which not yet included into the test. Select question which you want to add in your test and click on Add Selected Question button to add selected question in your test.

    Add Questions in Test - screenshot 3

Publish Test

Step IV: Publish Test:

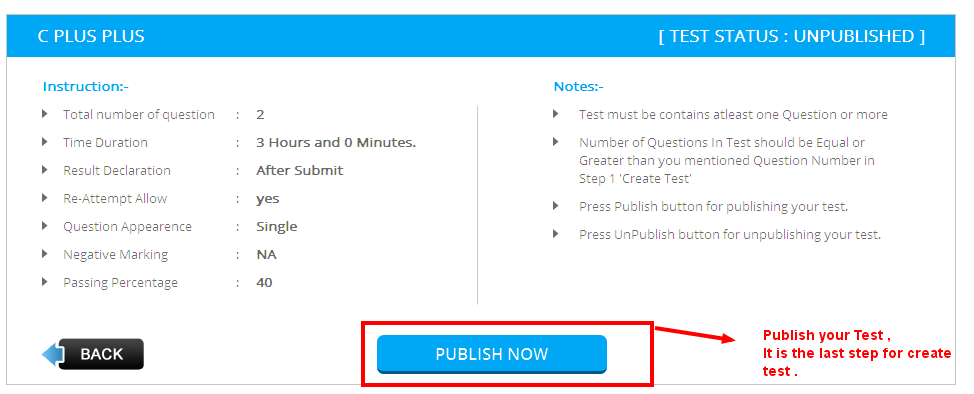
After adding question in test at ManageQuestion in Test Page you will see a button for Publish the Test.

Publish Test - screenshot 1

Create Question Bank

Question Bank:

It’s a very Fabulous Featured for you that is Creating Question Bank .Question bank is sort of place where you can populate the questions by uploading questions manually or importing an excel sheet of questions to the site and use this questions at the time of test Creation.

User can create the N numbers of Question Banks based on the category like;

  • Science,
  • General Knowledge
  • Programming... Etc

Using this option, the user can create and manage the question bank

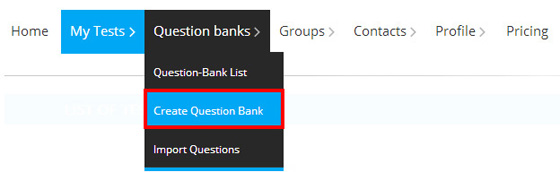
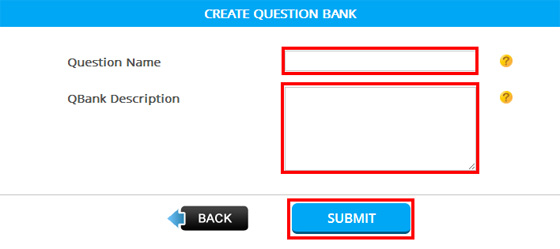
1. Create QuestionBank: Admin can add question bank from this option.

Create Question Bank - screenshot 1

After press the create QBank and you get the form of create question bank and here you fill required parameters like name and description as shown in following images...

Create Question Bank - screenshot 2

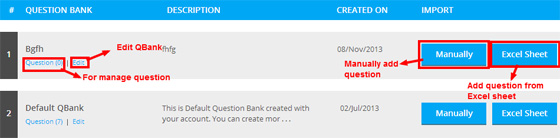
2. QuestionBank List: After submitting details and you redirect to question bank list .Here you see the list of question bank which is created by you. Here also you add question in question bank, import question in this question bank and also edit this Question bank. Shown in Images

Create Question Bank - screenshot 3

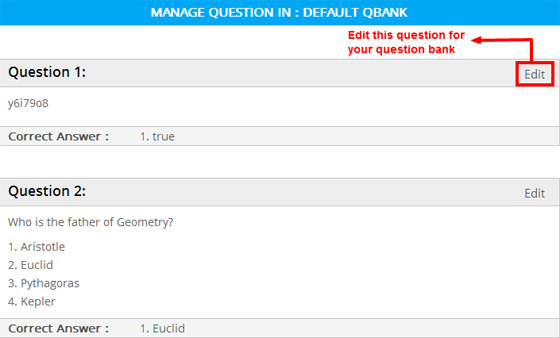
2. Manage Question in QuestionBank: You can Manage Question Bank by clicking on the Manage Question and you will reach this page.

Create Question Bank - screenshot 4

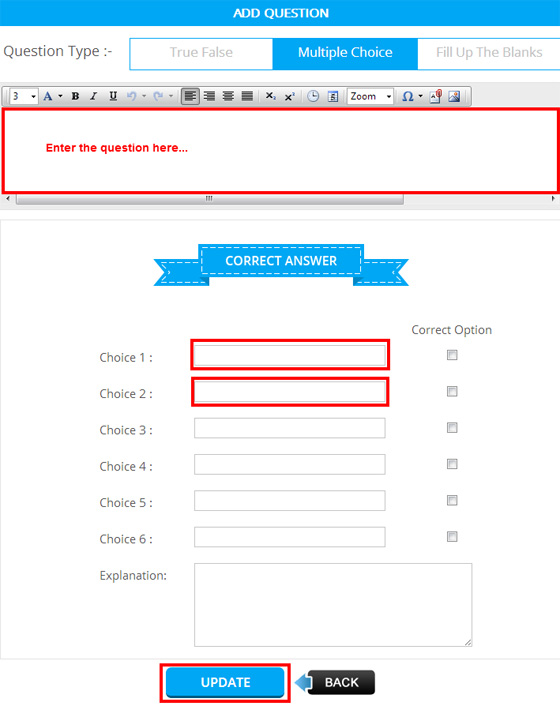
3. Add Question Manually: show in below image..

Then add question page will open, fill required details and click on Save & New for add more question or click on Save & Exit button to back the Question Bank list.

Create Question Bank - screenshot 5

Import Questions from Excel Sheet

4. Import Question in Question Bank:

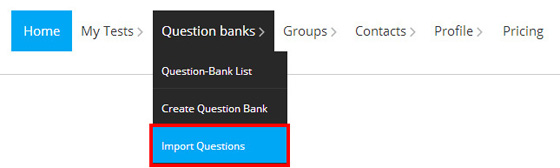
How to Upload Excel Sheet in Question Bank:you can upload your question via pre formatted Excel sheet; you can download it from the site from the Download Section. You can find the link for Import Question as show below

• At Question Bank List: below link

Import Questions from Excel Sheet - screenshot 1

• From Top Menu:

Import Questions from Excel Sheet - screenshot 2

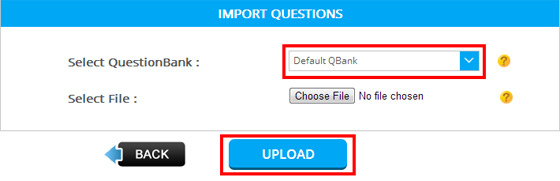
After click on this link a page will open like this

Import Questions from Excel Sheet - screenshot 3

Select the appropriate Question Bank in which you want to import the question, and select the excel file and click on Upload button. After completing the process you will get a message if all question imported successfully. Else a list of failed question below you can see the entire imported question by clicking on Show Question button.

View Test Statistic

Admin user can see all the Test Statistics through this way :

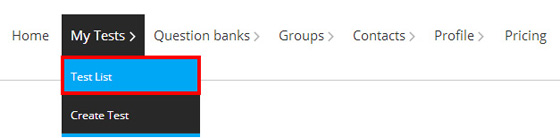
Click on the link My Test , shown below to see all the Test List.

View Test Statistic - screenshot 1

After click on the link the Test List will look like this.

View Test Statistic - screenshot 2

There is a link for see the Test Statistics for each and every test, click on the link View Statics, All the statics for that particular test will show as in below picture.

Statics Chart and the Table form will look like this.

View Test Statistic - screenshot 3

Create Contacts

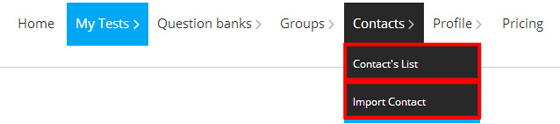
Contacts:Admin can manage the contacts by clicking on Contact in Menu. From this section admin can add, edit or remove the contacts. Using this link:

Create Contacts - screenshot 1

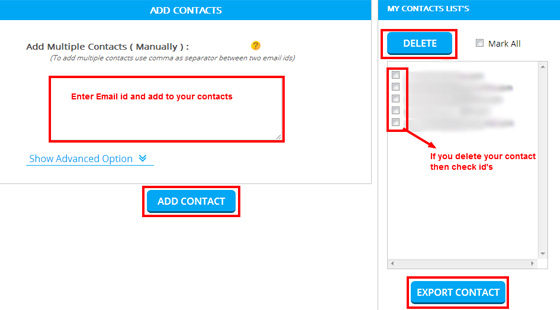
A new page will open look like this:

Create Contacts - screenshot 2

• Add Contacts: The admin can add a contact from here. The admin can enter a single email id or multiple email ids separated with commas in the text area, as shown the picture above.

• Contact List: The contact list can be seen here, which are added in the admin account. User can delete contact from the given list, as shown the picture above.

• Export Contact into Excel Sheet: Admin user can export the available contact list into a excel sheet by using Export Contact button as shown the picture above.

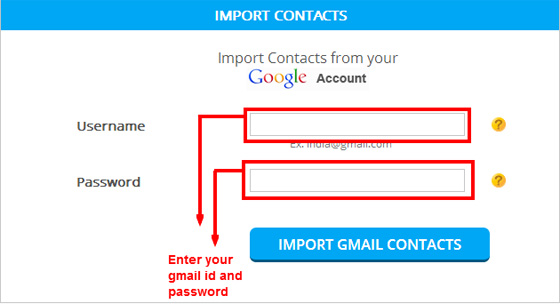
• Import Contact: The Admin can also import the contact from his/her Gmail account. That can be achieved through this option. Refer below image.

Create Contacts - screenshot 3

Create Contacts - screenshot 4

Provide your Gmail id and Password and click on ImportGmailContacts button.

Create Group

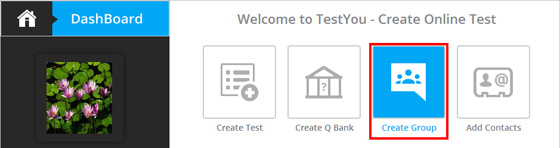
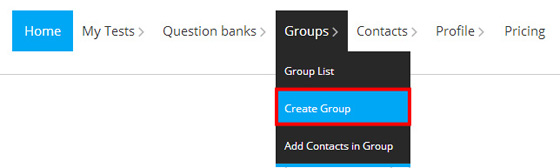
Create Group:One more featured for you Create Group. It is very use full for yours. Lets Group your Contacts and Assign your Test to Relevant Group. With the help of Group, you can create Private Test which is visible only within the Group. So go to group menu and under this menu you see create group menu as shown in image.

i. At Admin Home page :

Create Group - screenshot 1

ii. From the MenuBar :

Create Group - screenshot 2

Here you can give a name and add description about a New Group.

Create Group - screenshot 3

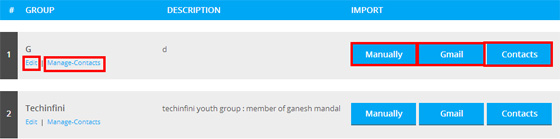
After press the submit button you will redirect to View group Here you see all list of group which are created by you And Here also perform many operation like edit, Add contact from your contact list to this group , import contact from your Gmail account, Manage contacts and add contacts manually,

• Group List: Adding a group to the account, the admin can see the group list from here.

Create Group - screenshot 4

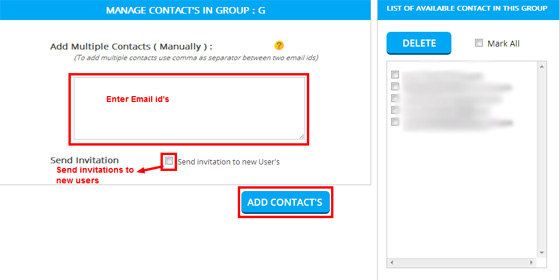
If you select the Add Manually Option then you add contact from simple enter the email ids whose you add in your contacts. Here also you get the list of all contacts IF already added in this group. And here also send invitation to new user as show in below image.

Create Group - screenshot 5

Another option you have Import contact from your Gmail account to that group those shown in below image.

Create Group - screenshot 6

Select the a group in which you want to add contacts from the top list, and the list of all the remaining contacts will be generate below, choose contacts and click on Add Contact button. Selected contacts will add in selected group.

• Edit Groups: Admin can manage the groups also by either editing or removing the groups.

By clicking on the Group name from the Group list.

Create Group - screenshot 7

Change whatever you want and click on Update Group button to update the group details.

If you wish to delete this particular group then click on Delete Group button to delete the group permanently.

Account and Membership

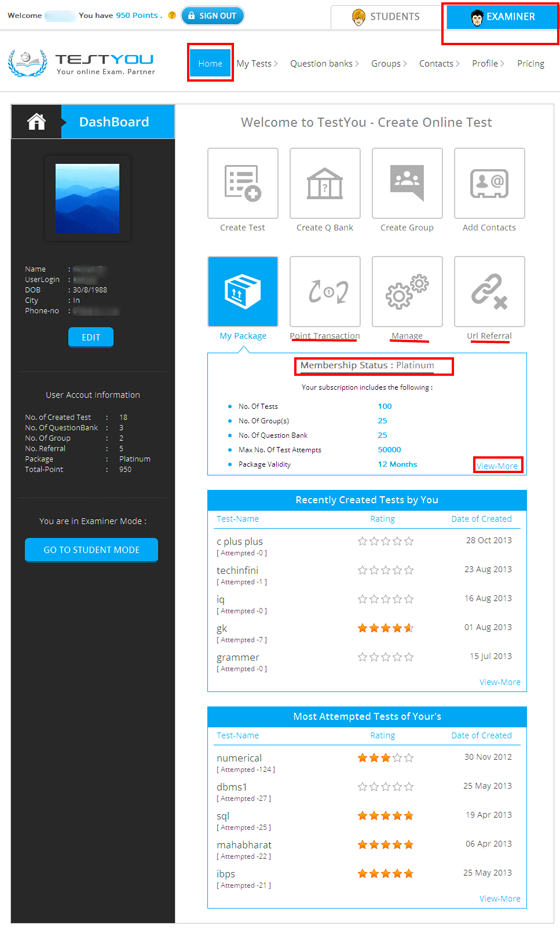
Admin Index page:Select menu of home and see you account :

Account and Membership - screenshot 1

In home page you see your following information like: Account, Package

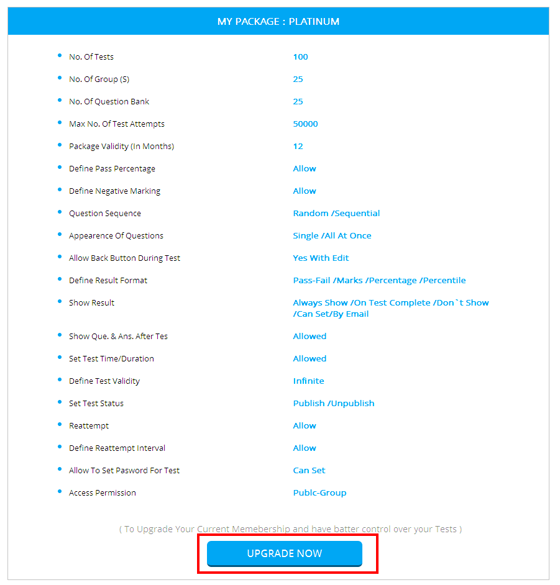
After clicking View More from My Package you get all information about your package and also you upgrade you package. As shown in image.

Account and Membership - screenshot 2

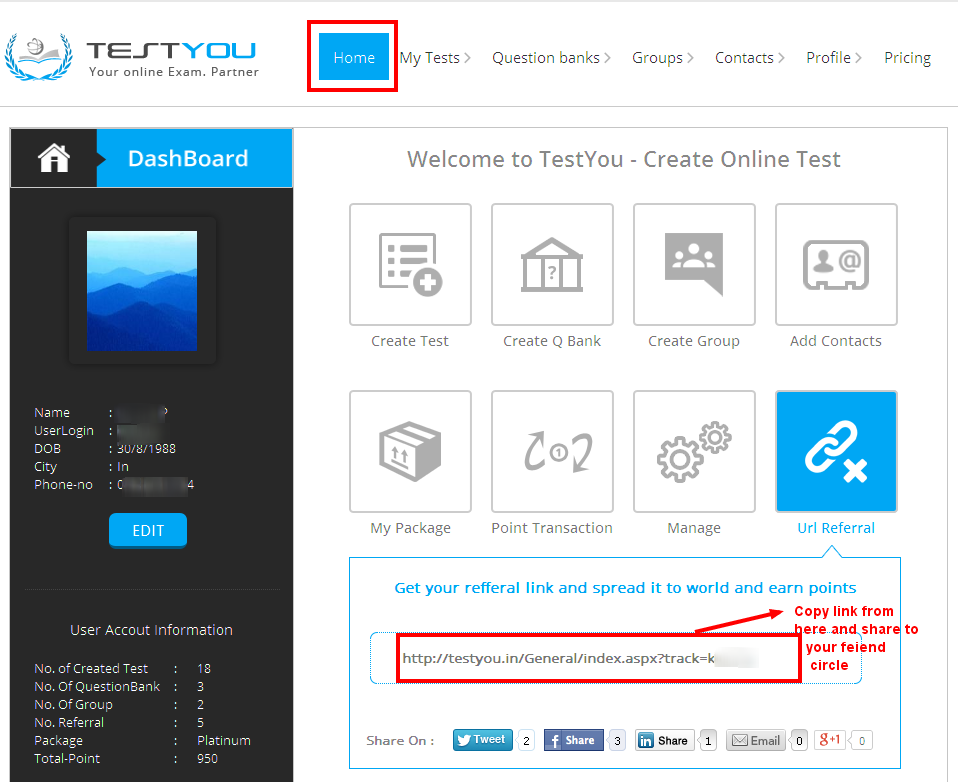
Referral

It is fabulous featured for you: Best place to invite your friends for a healthy competition. Take tests together on Testyou.in.
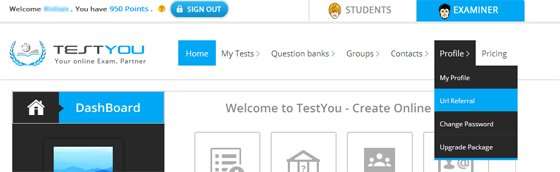
Select menu from home :

Referral - screenshot 1

Referral - screenshot 2

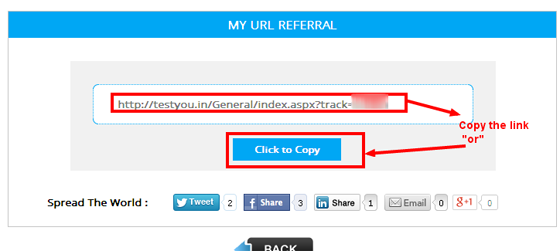
After clicking this you find referral’s page and Doing following operation as shown in image:

Referral - screenshot 3

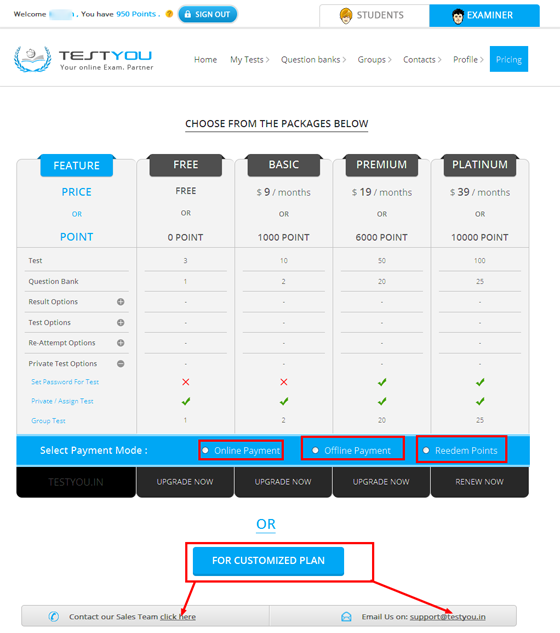
Upgrade Package

For upgrade package you select the upgrade package sub menu in profile menu as shown in below image:

Upgrade Package - screenshot 1

After clicking this you get the plan here your get the all information of your package and also upgrade your package as your choice. As shown in image.

Upgrade Package - screenshot 2

Password Protected

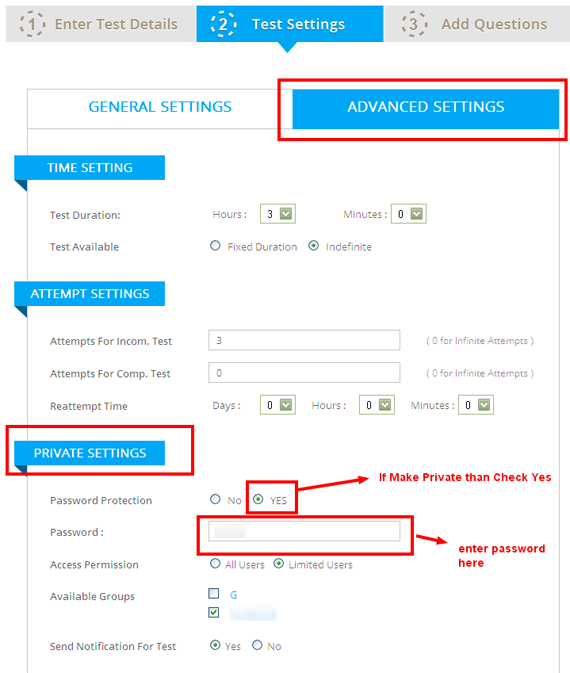
Password protection is also part of Test Setting. Password protection is also advance featured for you. Its uses, you can protect your test and make your test private and for your group: It’s available in TestSetting option and go to advance option as follow given image

Now you will see the Create Test Page
Here you enter details of your test which you want to create…. and you will be redirect to test setting page

Password Protected - screenshot 1

It’s available in TestSetting option and go to advance option As follow given image

Password Protected - screenshot 2

After going advance option you see attempt setting option you select the link than you get the option of password protection as shown in image

After select 'yes' then you get the option of password You enter the password and click the update As shown in image:

Private Test & Group Test

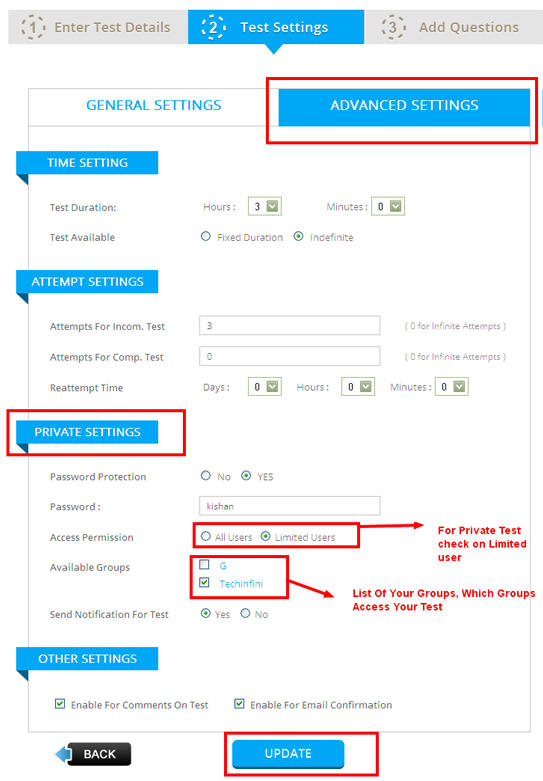
Private Test & Group Test are also part of Test Setting. Here you make a test privately; this test is only visible in assigned group by you. And also use password. This test is hidden from all users.

Now you will see the Create Test Page
Here you enter details of your test which you want to create…. and you will be redirect to test setting page

Private Test & Group Test - screenshot 1

It’s available in TestSetting option and go to advance option As follow given image

Private Test & Group Test - screenshot 2

Time Based Test

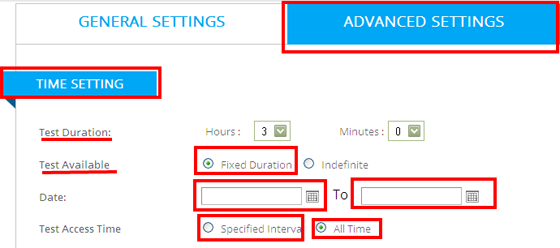
Time Based Test is also part of Test Setting. Here you set your test available for only specific date and time. Like your test is same us our semester exam is only available in fixed time intervals.

Now you will see the Create Test Page
Here you enter details of your test which you want to create…. and you will be redirect to test setting page

Time Based Test - screenshot 1

It’s available in testsetting option and go to advance option Here You set date and time -

As shown in image

Time Based Test - screenshot 2

Reattempt Feature

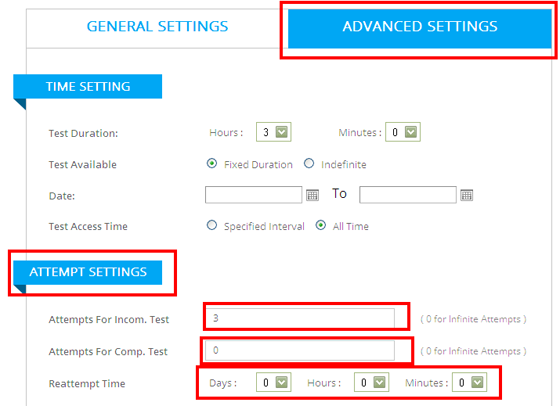
Here you enter details of your test which you want to create…. and you will be redirect to test setting page You seen many time any unwanted occurrences like power OFF, slower internet speed, etc your test is not completed and you miss chance, But here you set reattempt setting for your test :

Now you will see the Create Test Page
Here you enter details of your test which you want to create…. and you will be redirect to test setting page

Reattempt Feature - screenshot 1

In this you set No. of incomplete test ,complete test and after what time you give test means reattempt time:

As shown in image

Reattempt Feature - screenshot 2

Negative marking

Negative marking is also part of Test Setting. Here you create your test some complicated means you set negative marking for wrong answer.

Now you will see the Create Test Page
Here you enter details of your test which you want to create…. and you will be redirect to test setting page

Negative marking - screenshot 1

Here you enter percentage of question marks

As shown in image

Negative marking - screenshot 2

Result Format

Result Format:

Result Format is also part of Test Setting. Here you set the format of your test result that you give to your user.

Now you will see the Create Test Page
Here you enter details of your test which you want to create…. and you will be redirect to test setting page

Result Format - screenshot 1

Here you set following setting like marks, pass or fail, rank etc as shown in figure below.

Result Format - screenshot 2

Embed Code for your website

Generate Embed Code:

TestYou is now coming up with its new embed code feature for you through which you can use testyou from your own website. To use testyou from your own website, you just need to add an html code in your site and after that you will be able to use testyou from your own website or blog.
To get this embed code please follow the instructions given below :-

After login you need to go to "Examiner Page".

Embed Code for your website - screenshot 1

Now go to "My Tests" and than select your test from here..

Embed Code for your website - screenshot 2

Now select your test from "Test's List".

Embed Code for your website - screenshot 3

After the selection of test you will be able to get your code, just click on "Generate Embed Code".

Embed Code for your website - screenshot 4

And in last, just copy the code and paste it on your website, your test will appear on your website.

Embed Code for your website - screenshot 5

<< Previous Next >>

Student User

  • General
  • Search Test
  • Attend Test
  • Result History
  • Manage Profile
  • View Assigned Test
  • Virtual Discussion

Admin User

  • General
  • Create Test
  • Enter Test Details
  • Test-Setting
  • Add Questions In Test
  • Publish Test
  • Create Question Bank
  • Import Question From Excel
  • View Test Statistic
  • Add Contacts
  • Create Groups
  • Account And Membership
  • Referral
  • Upgrade Package

Special Setting For Test

  • Password Protected Test
  • Private Test
  • Time Based Test
  • Reattempt Feature
  • Negative Marking
  • Result Format
  • Generate Embed Code